Silicon
Microarray™ Pins User Data
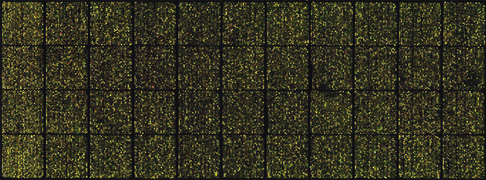
The
below scanned microarray image is obtained from Dr. Joe DeRisi's
lab at UCSF
which is printed using 50µm x 50µm silicon pins. The spots are
spaced on 160µm centers
using orange crate packing. Please
click on the image to see an enlarged view.
Silicon
Microarray™ Pins Frequently Asked Questions (FAQs)
1.
Purchasing the Si Pins (Financial and Technical Questions)
1.1.
What types of arrayers are compatible with the
silicon pins?
1.2. Do I need an adapter to mount the silicon
printhead to my arrayer?
1.3. How much do the pins cost?
1.4. Is there minimum order requirement?
1.5. Is there a volume discount if I purchase multiple
pins?
1.6. How long will it take for me to receive my
pins?
1.7. What size of pins should I order?
1.8. What types of payment do you accept?
1.9. What other tools or accessories do I need
to print with the pins?
1.10. Do you have any references to vouch for
your products?
1.11. Do you perform test or production or printing
services?
1.12. What are your terms and conditions of purchase?
2.
Technical Support
2.1. What is your policy on technical support?
2.2. Do you offer on-site technical support?
3.
Printhead Installation and Configuration
3.1. Do I need an adaptor to mount the printhead
to my arrayer?
3.2. Should I insert the pins before I mount the
printhead?
3.3. Do I need to level the printhead? How do I
level the printhead?
3.4. Is my wash station compatible with your printhead?
3.5. How do I load/unload the pins?
3.6. What acceleration, velocity, and other printing
parameters are required for using the Si pins?
3.7. How should I configure my washer and drier
set ups for efficiently washing the pins?
3.8. Why are the Si pins easy to clean compared
to metal pins?
3.9. How do I deep clean the pins? Can I sonicate
them?
4.
Problems with Printing
4.1. How do I reduce the number of missing spots
or other printing inconsistencies?
4.2. Can I print at humidities other than 60%?
4.3. What if the pins get stuck in the collimator?
4.4. What should I do if liquid splashes into the
printhead?
4.5. What if I see a gradual decrease in print
quality?
5.
Pin Care and Maintenance
5.1. What is the proper way to flame the pins?
5.2. Can I sonicate the pins?
5.3. Are the pins incompatible with any cleaning
solutions?
5.4. How do I get rid of carryover?
5.5. Why are silicon pins more easily cleaned than
metal?
5.6. How should I store my pins when not in use?
6.
Printing Protein or Other types of Arrays
6.1. Can I use silicon pins to print protein arrays?
6.2. What is the CV % from pin to pin?
6.3. What is the carryover from sample to sample?
6.4. What types of buffers and slides are compatible
with silicon pins?
6.5. Can I print carbohydrate arrays with silicon
tips?
1.
Purchasing the Pins (Financial and Technical Questions)
Go to top
1.1.
What types of arrayers are compatible with the silicon pins?
The pins and printhead are compatible with almost all types of
arrayers, including Omnigrid, Microgrid, Qarrays, etc. There are
a few types that might require an adaptor. To check whether or
not you might need an adaptor, click
here.
1.2.
Do I need an adapter to mount the silicon printhead to my arrayer?
Please click
here to see a list of arrayers and their required adaptors.
If you are still uncertain, please call or drop us an Email and
we will be happy to help you.
1.3.
How much do the pins cost?
For a complete list of pins and accessory prices, click
here.
1.4.
Is there minimum order requirement?
Yes. The minimum order is 5 pins or $600, whichever is lower.
1.5.
Is there a volume discount if I purchase multiple pins?
Deep volume discounts are available for orders of > 100 pins.
Please call for more information.
1.6.
How long will it take for me to receive my pins?
After receipt of a completed order, pins typically take 3-5 business
days to arrive. Any changes in the delivery time will be noted
on the quotation.
1.7.
What size of pins should I order?
This depends on what size spots you would like to print. Average
spot diameters for DNA printed on superamine slides are ~ 30-40
microns larger than the size of the pin tip. In contrast, the
size of the spots printed on hydrophobic slides, such as those
coated with epoxy or aldehyde, will be closer to the actual size
of the tip. These estimates can vary considerably depending on
the hydrophobicity/hydrophilicity and integrity of the slides,
printing solutions and surface substrates, which can also be affected
by age. If you would like a better idea of how these factors affect
spot size, please Email for additional information.
1.8.
What types of payment do you accept?
We accept all major credit cards (Visa/Mastercard/AMEX), purchase
orders, and wire transfers. If this is your first order, price
must be paid in full (international) or 50% (domestic) before
shipment. Our payment terms are NET 30 for subsequent orders.
1.9.
What other tools or accessories do I need to print with the pins?
The silicon pins and printhead ship with all the necessary tools
and accessories needed for their using them with your arrayer.
You will also need a butane torch (for cleaning the pins), a dial
gauge (for leveling the printhead), and an enclosed printing environment
with humidity control.
1.10.
Do you have any references to vouch for your products?
Yes. Please call or Email for this information.
1.11.
Do you perform test or production or printing services?
Yes. Please call for pricing information.
1.12.
What are your terms and conditions of purchase?
Please click here
to see the terms and conditions.
2.
Technical Support Go
to top
2.1.
What is your policy on technical support?
For
customers who purchase products directly from us, we offer free
technical support before, during, and after installation. We also
provide a FREE orientation call for new customers to help them
get used to the silicon pins. Please call to schedule an appointment.
2.2.
Do you offer on-site technical support?
Yes. Please call for pricing information.
3.
Printhead Installation and Configuration
3.1.
Do I need an adaptor to mount the printhead to my arrayer?
Please refer to question 1.1.
3.2
. Should I insert the pins before I mount the printhead?
No. After mounting the printhead onto the motion control system
of your arrayer, all the motion control movements, printing parameters
and hardware should be completely tested and verified before loading
the silicon pins into the printhead. After this initial set-up,
we recommend loading a single pin, or 4 pins (one at each corner)
and performing a test run to validate the printing procedure.
3.3.
Do I need to level the printhead? How do I level the printhead?
Yes, the printhead must be level for optimal performance and consistency.
The best way to level the printhead is to use a dial gauge. Load
some slides onto the platform, then place the gauge on top of
the slides and activate the magnetic base. Position the pressure-sensitive
probe of the gauge so that it is lightly touching the underside
(or as an alternative, the top) of the printhead on the end nearest
you. Manually move the motion control arm in the Y direction (towards
you) and check the reading on the gauge to ensure that the printhead
is level to within 10 microns, or +/- 1/1000th of an inch.
3.4.
Is my wash station compatible with your printhead?
Our pins and printheads are compatible with most wash and dry
stations. Please check the User's Manual,
Section 6 if you have any questions.
3.5.
How do I load/unload the pins?
Please refer to sections 4 "Loading Pins" and 8 "Unloading
Pins" in the User's
Manual.
3.6.
What acceleration, velocity, and other printing parameters are
required for
using the Si pins?
Please refer to the Users's
Manual, Section 5.
3.7.
How should I configure my washer and drier set ups for efficiently
washing the pins?
At Parallel, extensive testing has repeatedly shown the high value
of a good washing system for cleaning. The silicon pins can be
easily cleaned in a wash bath with continuous supply of fresh
wash solution followed by drying with air using a vacuum dry station.
Do not use an ultrasonic cleaner to wash the pins.
Do not dry the tips with canned "air" or other propellants!
Many of these propellants contain extremely hydrophobic hydrocarbon
or fluorocarbon polymers which are very difficult to remove from
the tip. Sections 6.1 and 6.2 in the User's
Manual give detailed instructions on how to adapt your
existing washer-dryer stations for effectively cleaning the pins.
3.8.
Why are the Si pins easy to clean compared to metal pins?
Silicon pins are much easier to clean, and wash cycles can be
much shorter (1-2 sec) than those used for traditional metal pin
tools. One reason for this is that their internal reservoirs are
more wash-accessible due to their shape and size. Also, the surfaces
of silicon pins are chemically glass (silicon dioxide) and thus
are stable to oxidation at temperatures of 1000 Celsius. Because
of this property, the pins can be deep cleaned with a butane torch,
thus oxidizing the organic contaminants and leaving the pin surfaces
free of deposits. These cleaning properties ensure that silicon
pins have minimal carryover compared to other types of pins.
3.9.
How do I deep clean the pins? Can I sonicate them?
Do not sonicate the pins under any circumstances. For deep cleaning,
rinse pins in buffer, then in distilled water, dry, then flame
with butane torch. Make sure no flammable substances are within
5 m of the butane torch. You do not need to unload the pins for
deep cleaning. Please refer to the User's
Manual Section 7 for more information.
4.
Problems with Printing Go
to top
4.1.
How do I reduce the number of missing spots or other printing
inconsistencies?
If the pins are printing inconsistently with random spots missing:
-
Make sure the printhead is leveled and the pins are touching
the slides.
- Check
the relative humidity. Silicon pins print best at 55-60%. To
see the effects of humidity on printing performance, click
here.
- Make
sure all slides, surface substrates, and printing solutions
are in working order. Quality of substrates can drop precipitously
over time. Make sure nothing is past its expiration date.
- Make
sure the pins are clean. Give them a quick torch cleaning if
necessary.
If
the missing spots are not random:
- Chances
are a pin is damaged or dirty, or there is a problem with the
source plate. Check corresponding pin with a microscope and
replace as necessary.
4.2.
Can I print at humidities other than 60%?
Printing is optimal at relative humidities >55%. Below this,
the printing performance suffers, with missing spots and fewer
spots/pickup. Please click
here to see the difference in printing performance
as the relative humidity drops to 35%. The silicon pins are sensitive
to relative humidity levels due to their smaller pickup volumes.
4.3.
What if the pins get stuck in the collimator?
If a pin becomes jammed in the collimator due to drying of the
wash solution or the printing buffer on the pin shaft, soak the
pins in distilled water by flooding the metal holder for a few
minutes and then gently pick up the pins with tweezers. Do not
forcibly remove the pins at any time.
4.4.
What should I do if liquid splashes into the printhead?
Disassemble the printhead carefully, clean and dry before reassembling
and using.
4.5.
What if I see a gradual decrease in print quality?
Your pins have likely accumulated deposits of protein, DNA, or
organic substances. Rinse them several times in water, dry and
then flame them with a butane torch to deep clean. Keep flammables
at least 5m away from the butane torch.
5.
Pin Care and Maintenance Go
to top
5.1.
What is the proper way to flame the pins?
Please refer to the User's
Manual, Section 7.
5.2.
Can I sonicate the pins?
No. Please refer to question 3.9.
5.3.
Are the pins incompatible with any cleaning solutions?
Yes. Do not expose pins to strong bases, such as hydroxide or
ammonia.
5.4.
How do I get rid of carryover?
None of our customers have reported carryover problems. However,
to minimize this phenomenon, please refer to the washing section
(Section 6) in the User
Manual.
5.5.
Why are silicon pins more easily cleaned than metal?
Please see question 3.8 above.
5.6.
How should I store my pins when not in use?
To store pins when not in use, place them back into their shipping
containers and place them somewhere safe.
6.
Printing Protein or Other types of Arrays Go
to top
6.1.
Can I use silicon pins to print protein arrays?
Yes. Protein arrays benefit from the same virtues of the silicon
pins as do nucleic acid arrays. Due to the size of the printing
tips, the properties of their silicon dioxide surface, and their
precision and ability to be thoroughly cleaned, silicon pins display
excellent pin to pin uniformity and exhibit minimal carryover.
To see examples of protein arrays printed with silicon pins, click
here.
6.2.
What is the CV % from pin to pin?
We have obtained a %CV of 3% for individual pins, and an average
of 6% from a collection of 32 randomly-selected pins. To see the
data, click
here. Note that this data was obtained for arrays printed
on nitrocellulose-coated slides.
6.3.
What is the carryover from sample to sample?
Our experiments printing arrays of Cy5 and Cy3 labeled antibodies
demonstrated a sample to sample carryover rate of <0.05%. Please
see question 3.8 to understand why silicon pins give less carryover
compared to metal pins.
6.4.
What types of buffers and slides are compatible with silicon pins?
We have tested every commercially available slide substrate and
have not detected any incompatibilities.
6.5.
Can I print carbohydrates with silicon tips?
Yes. The same properties that make silicon pins ideal for printing
nucleic acid and protein arrays also makes them appropriate for
printing carbohydrate. Practitioners of carbohydrate array printing
should be particularly appreciative of the ability to clean and
remove 100% of even the most viscous, tenaciously sticky and insoluble
chemically recalcitrant carbohydrates from printing tools in just
a few seconds by flaming with a butane torch. Please see the images
of pin cleaning to see how effective this treatment can be in
the carbohydrate
array information sheets.
